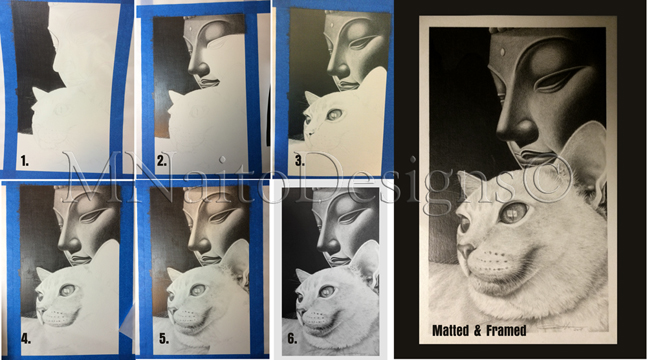
Here are the progress pics of the portrait of Kazu, the sweet, little, blonde Burmese and Buddha. As an artist, I love seeing other artists’ works in progress. I love to see that creative process. For me, it serves to inspire. And so, I hope my own progress pics will do the same for you. Or at the very least, give you some insight into how I work things out.
In the first image, you can (hopefully) see the very faint outline of the image I’d be working on. Since I’m right-handed, I always start from the upper left corner and work my way down to avoid smearing the pencil. I use a variety of pencils of varying hard/softnesses. Some people have asked about the super black area. That too, is pencil. It’s an artist’s pencil with a very soft 8B lead, which allows me to get that extremely dark black. Also, before I put down any pencil, I use a needle-like tool for sculpting to score the paper wherever Kazu’s white whiskers will be and also select areas of fur, which would need to show against a darker background. With the paper scored, I can just shade right over it and the indented line will remain white. That way I avoid having to literally draw around each fur, whisker, etc.
By the end of the 2nd day of work, I had reached a point between the 3rd and 4th image. That’s when I slowed things down a little bit so that I wouldn’t finish TOO far ahead of schedule. As it turns out, the whisker lines that I scored early on, weren’t quite deep enough and had to be enhanced a bit as they weren’t standing out enough against that black background. So, I did something I’ve never done before with one of my drawings. In its nearly finished stage, I took a fine paintbrush and white paint to it. With my heart in my throat and hands that always tremble just slightly, I went over each whisker, one by one until they popped just a little bit more. Talk about a sigh of relief when that was over!
As I said in my last post, it was still done about three weeks ahead of time. I left it and came back to it occasionally with a fresh eye, making minute adjustments here and there. When I was finally satisfied, I sprayed it with a fixative, which basically locks the graphite in place and prevents any smearing whatsoever. I could literally take an eraser to it and that lead wouldn’t budge, and even then, I couldn’t relax until it was behind glass.
So that, in a nutshell is my creative process. Thanks for tuning in! On to the next…
This blog contains Amazon Affiliate links. As an Amazon Associate, I may earn from qualifying purchases.
Recent Comments